|
|
Post by Daos on Apr 4, 2018 23:24:48 GMT -8
You're right that Shadow Door is in Baldur's Gate. So why it's not in this game, when they use the exact same engine, I can't say.
|
|
|
|
Post by Daos on Apr 13, 2018 19:15:02 GMT -8
Going through the secret door, the party enters a large circular room that bears a strong resemblance to the table in the previous room. 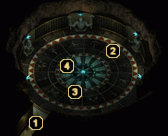 However, there are some differences in the symbols. They don't perfectly match. Jherek volunteers to try something. He walks over and steps on one of the symbols that don't match the table. There's a loud, clacking sound as a result. We do this to the other two symbols with similar results. Then we return to the room with the table to find that one of the statues now has its hammer down. Checking it, Katya finds a switch and flips it. Then there's an even louder sound coming back from the secret room. Returning to it, we find a staircase has formed, leading down below. We also get 56k XP. Downstairs, we find a massive but cold forge. A spirit guards it, but it is willing to speak with us. 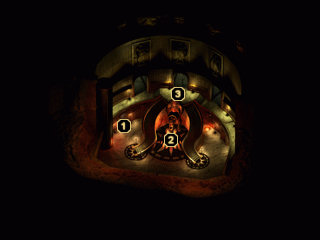 The spirit tells us that it once was a cleric of Moradin that worked the forges here in Dorn's Deep. He gives us some history on this place. It turns out that the dwarves of Dorn's Deep were invaded by orcs, just like the elves of the Severed Hand were. The spirit, Norlinor, denies the dwarves gave weapons to the orcs as the elves claim. Rather, he suspects that someone was manipulating both sides to turn them against each other. After the orcs were driven away, another problem cropped up. It seems there was a portal to the Negative Energy Plane down there that the dwarves accidentally dug up. It started producing massive amounts of undead. But Moradin sent a miracle to save them by possessing a young dwarf and smiting all of the undead. Now there's a new problem. A necromancer named Terikan arrived in hopes of studying the portal. He turned himself into a lich and his hope is to find a way to control the portal and others like it throughout the Realms. Norlinor tells us the location of the lich's phylactery in the crypt. If we can throw it into the portal, it should be destroyed. Unfortunately, the lich stands between us and the phylactery, as well as the portal. We'll have to destroy it first, then destroy the phylactery before the lich reforms. On the bright side, Norlinor is a cleric, so he can heal and raise us if need be. Current Party Levels: Ladonna (Enchanter 10) Ryan (Mage 9/Cleric 8) Theron (Illusionist 9/Thief 9) Katya (Paladin 8) Jherek (Fighter 8/Thief 9) Lillian (Bard 11) Next time: Tiers of the Dead! |
|
|
|
Post by Daos on Apr 17, 2018 16:04:15 GMT -8
I've decided not to play through the expansion packs for this game. I figure doing so will add another month or two to this playthrough, and my hope is to finish it before Pillars of Eternity II comes out next month. The first one took me a whole year to beat, so I want to have a clean plate when I start on the sequel. Anyway, moving on, the party enters the next room and we are immediately attacked by a score or so of zombies, ghouls, wights and skeletons.  After the fight is over, Theron checks for traps and loots any magical items found in the various sarcophagi around the room (leaving mundane items alone). Even then, we're about out of inventory space. Really wish there was someone around here to sell magical items to. Most of the items are weaker than what we have (+1 swords and daggers and such), but one item of note is the Reinforced Large Shield +2, which I give to Ryan. (I can't believe Ryan has not had a shield until now. I guess it just never dawned on me until now that he could carry one.)  Ladonna conjures a fire elemental and sends it ahead as the party climbs the stairs and encounters the lich. While the elemental, Katya and Jherek focus their attacks on it, the others sling spells. We kill it fairly easily, and the other undead in the room collapse. Although Theron and Jherek would be happy to loot the remaining coffins, there's no time. Until Terikan's phylactery is destroyed, he'll continue to respawn. We grab the key and bolt into the next room. Whatever loot we left behind can be claimed on our way back out. Unfortunately, we are a little too slow. Before we can grab the phylactery, Terikan reforms in the next room. The whole party charges him, keeping him busy, while Theron alone sneaks off. With everyone focused on the lich, he can't get a spell off. Theron finds the tomb holding the crystal, disarms the traps, grabs it and then makes a beeline for the portal. He throws it in just as the party kills Terikan a second time, this time ending him for good. The party earns 52,500 XP for this. With that pressure off, we can now take our time exploring the tombs. There are multiple traps, but Theron takes care of them. One tomb has a greater mummy in it, but it's not a real issue for us by itself. We find Terikan's journal, and from it learn to continue deeper we need a key found in the now dead forge we encountered earlier. We also find the tomb of Evayne, the daughter of Larrel. Her journal explained she came to Dorn's Deep to make a peace treaty with the dwarves, and succeeded. But then the orc hordes arrived, and she apparently not only died fighting alongside them, but the dwarves built a special tomb for her in the Hall of Heroes. We also find more loot. The most noteworthy items were a Helm of Lathander, which goes to Katya.  And a flute known as Owain's Lullabye, which goes to Lillian. Despite the name, it doesn't cast Sleep as you might think.  We also find scrolls of Monster Summoning III (went to Theron, as he has no level 5 spells yet), Chaos (went to Ladonna), Domination (went to Ladonna), and Anti-Magic Shell (nobody can use level 6 spells yet, so I'll hold on to it). We return to the Tiers of the Dead and loot the stuff we missed, but most of it's just going to be sold later. We find find one item of note. A white chess piece. It will, upon use, summon a high level cleric who will heal the party continuously until she either runs out of spells or is killed in battle. I don't think I've ever encountered this before (or at least, I don't remember doing so). It's a one-shot item, so I'll probably hold on to it until the need is quite dire. Speaking of gear, we really need to find a shop. Everyone's loaded down and both Jherek and Ladonna are encumbered at this point. Returning to the forge, we find it is working again. The spirit, Norlinor thanks us for our help then vanishes. Ah, no more free healing then. Now that the forge is working, we can access a compartment inside it and in there we find yet another magical axe (+4) for Jherek and a key to the next area.  We get 84,000 XP and both Katya and Theron level up. Current Party Levels: Ladonna (Enchanter 10) Ryan (Mage 9/Cleric 8) Theron (Illusionist 9/Thief 10) Katya (Paladin 9) Jherek (Fighter 8/Thief 9) Lillian (Bard 11) Next time: Wyrm's Tooth! |
|
|
|
Post by Daos on Apr 20, 2018 16:36:17 GMT -8
Get ready for Chapter 5! Before moving on, I have Katya give Ladonna and Jherek a Potion of Strength, so they aren't encumbered any more. It's a temporary solution, but it's better than nothing. 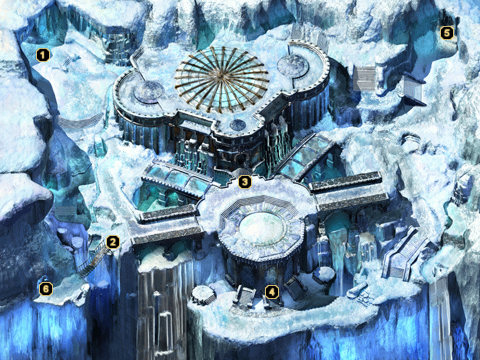 Immediately upon arrival we are beset upon by snow trolls and greater ice trolls. Ladonna summons a squad of lizardmen to aid Katya and Jherek in cutting them down, while Lillian keeps her fire arrows readied to finish off any that fall. Throughout the map, we fight numerous more trolls. Each one drops a gem, which goes into Theron's pouch. In the process, Jherek levels up. We also find lots of dead bodies strewn about--human bodies, from the looks of them. After clearing the area, we find a spot that lets us transition to the world map, and more importantly, come right back here instead of having to crawl through all of Upper Dorn's Deep again. So naturally, we make the three and a half day trek back to Kuldahar. We sell off all of our excess loot, buy some new spells and ammunition, and rest up. Then we spend three days to return to Upper Dorn's Deep to buy up those summon elemental spells remaining from Bandoth. Then we spend another day making it back to Wyrm's Tooth, rest up again, then buff up. It is now Day 67, Hour 8. We enter the large structure in the center of the map and find...what appears to be an aquarium that has been frozen over. 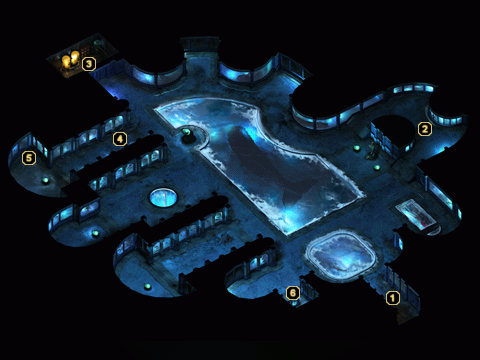 It's actually kind of cool looking (pardon the pun). There are sharks and whales and fish all trapped in ice. The place is also filled with frost salamanders (that are so cold they deal damage just by standing next to you), as well as some ice trolls and winter wolves. The salamanders take us to their leader, Kerish, who suspects we are sent by his master. Katya doesn't actually lie...but fails to correct this misconception. This gives us free reign to walk around unharmed, so long as we don't walk too close to the frost salamanders. We learn a few things from Kerish. First, his immediate supervisor is a frost giant named Joril Frostbeard who caused some controversy when he took over by killing his father, Kreg. Second, all of those human bodies we saw were slaves. Evidently the frost salamanders are using human slaves for some kind of labor, but they recently revolted and many were put down. But one of the humans found some controls that heated up the room below, making it too warm for the frost salamanders. The remaining humans are holed up in there, but cannot escape. Kerish isn't too concerned about them, believing they will eventually starve to death or be killed when they attempt to venture out for food. But he does ask us to slay their leader to assaunge his wounded pride. Katya tells him we will 'consider it' which again is technically not a lie. Before going to find the slaves, we explore the rest of the eerie level. In one corner, we find a human woman in stealth mode, hiding. She obviously doesn't trust us, and won't tell us much beyond her name--Vera. But I suspect she works with the slaves. We leave her alone and don't rat her out to the nearby trolls. Finally, we descend into the slave den. But it looks more like a library than anything. 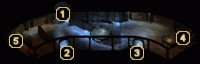 We encounter a scholar named Soth who loans us a book on bridge building, and learn more about this place from what he's been able to piece together. Evidently, this was originally a temple to Dugmaren Brightmantle, a lesser known dwarven god of knowledge and exploration. Dugmaren believes the dwarves should leave their mountains and get out and mingle a bit, so is seen as something of a weirdo. But one faithful servant of his took offense that there were no temples to him, so built this aquarium in his name. We also meet with the slave leader, Gareth. He tells us the story of what happened, which is basically the same as what Kerish told us. We let him know Vera was still alive (earning us 80,000 XP) and agreed to help the slaves escape. There is a way out, but they need a key that only Kerish has. So we'll have to go and deal with him. Hmm...I'm trying to remember if I have any spells, potions or scrolls that protect against cold damage. Current Party Levels: Ladonna (Enchanter 10) Ryan (Mage 9/Cleric 8) Theron (Illusionist 9/Thief 10) Katya (Paladin 9) Jherek (Fighter 8/Thief 10) Lillian (Bard 11) Next time: Freeing slaves and dealing with frost giants! |
|
|
|
Post by Daos on Apr 23, 2018 17:37:41 GMT -8
Into the Frost Giants' Caverns we go: 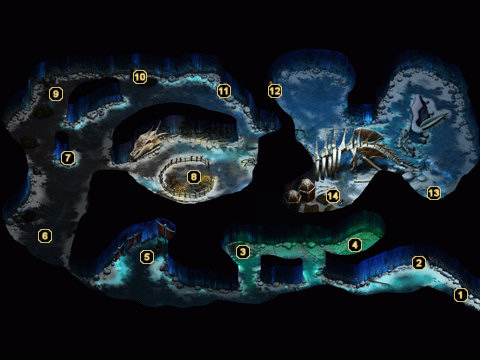 Right away we're greeted by a pack of winter wolves. They wouldn't be too much of an issue, were it not for their frost breath. Not only does it always hit (at best you can save for half damage), but it has an annoying habit of hitting those in the back row, too. After winning, it takes the last bit of Ryan's healing to top us off, and even then we're not in great shape. We find a little alter with a few item on it, including a couple of healing potions and a Ring of Holiness. That goes to Ryan, as it means more spell slots. Which means more healing overall.  We find a small lair of what looks like a bunch of baby white dragons. I don't see any of them breathe frost, though, so I'm not sure. Anyway, they are willing to talk to us. But they admit they like to eat people, so we end up attacking them. This battle drains the rest of stamina. We have plenty of spells left, but no healing and very low on HP. Plus, all of this loot has weighed us down again. (The wolf pelts don't stack, which is super annoying.) We do find, among the loot in their nest, a third musical instrument for Lillian, though.  So we backtrack to Kuldahar, sell our junk, heal up and stock up on ammunition. Sadly, there are no potions of cold resistance to be bought in town. We'll just have to make do. Then we walk all the way back to the frost giant's cavern. It is now Day 77, Hour 22. We then encounter the frost giants. There are several of them guarding their new leader, Joril, who sits on a massive throne next to a pet winter wolf. Katya manages to bluff him, never technically lying, but allowing him to think we work for his master. We trick him into giving over the badge. That's two down and we get 80k XP out of the deal. We also get him to tell us how he killed his father. He challenged the old man, claiming he was no match for the white wyrms. Then he made a deal with the wyrms to pretend they were beaten, then attack once his old man turned his back on them. In return, Joril gives the wyrms three slaves a day as food. Katya demands he releases the slaves, which makes him realize we are not who he thought. A big fight breaks out, but between Ladonna's fire elemental and Theron's demi-shadows, we make short work of the frost giants. We get lots of level ups. Lillian levels up, Theron and Ryan get levels in both of their classes, and Jherek gets a level in thief. Ryan is now strong enough to cast Raise Dead, at long last. We fight more giants and winter wolves, and Jherek levels up as a fighter. Then we come across a large pen filled with humans. Their leader, Davin Berenson, explains they are slaves but are slowly being sacrificed to the wyrms. Katya tells him the wyrms are dead, and he's grateful (and we earn 120k XP). He tells us there are only two ways out of the cave. The way we came from, through the frost giants' lair, and the second path. He doesn't know what is beyond that path, so asks us to check and make sure it's clear first. By this point, no kidding, we are bogged down with gear again. We return to Kuldahar, sell our junk, come back. It is now Day 87, Hour 6. We fight some more trolls and yetis (I don't bother picking up their pelts anymore, though; they don't stack and only give about 20 GP a pop now). Finally, tucked away under the remains of a dragon's spine, we meet with Kontik. He claims he was sent here by Auril, Goddess of Frost to avenge the cleric Lysan, the fake barmaid we met way, waaaay back? Nice callback. We make short work of him and his black ice knights with help from Ladonna's Fire Elemental. We get some nice loot from the encounter, including Kontik's Ring of Wizardry, which goes to Ryan. It double his 1st and 2nd level spell slots. More Magic Missiles all around!  We also get some level 6 spell scrolls. Nobody can cast them yet, but for the record they are Chain Lightning, Otiluke's Freezing Sphere, and Invulnerability. We also find a barrel of pure water, which I believe someone at the Severed Hand needed. Returning to the slaves, we let them know they are free to go and earn 180k XP. And that's it for this area. We can now move on to Lower Dorn's Deep. That's right, we're only about 2/3 the way through this dungeon. Whew! Current Party Levels: Ladonna (Enchanter 11) Ryan (Mage 9/Cleric 10) Theron (Illusionist 10/Thief 11) Katya (Paladin 9) Jherek (Fighter 9/Thief 11) Lillian (Bard 12) Next time: No more ice elemental stuff. Now fire elemental stuff! |
|
|
|
Post by Daos on Apr 30, 2018 22:43:06 GMT -8
Time for chapter 6! Immediately we are attacked by some fire salamanders...which I guess are the regular kind, really.  That's not really the issue, though. The issue are the Tarnished Sentries. These floating suits of armor have massive damage resistance and magic resistance. They hit hard and almost everything I throw at them, even elementals, do almost nothing. And they are all over the place. I wind up wiping three separate times to them. I keep trying to avoid them, but again, they are all over the place. There are Svirfneblin (Deep Gnomes) around, as well, but they aren't hostile. They seem to be working down here--mining of some kind, from the looks of it. We come across one, a little girl named Fengla (or so it is branded on her arm). Her tongue has been cut out, so she cannot speak. She has a key to the watchtower (#2 on the map) and apparently sensing our motives, happily hands it over. Entering the tower, we face half a dozen archers in a cramped space. Someone dies three times and I reload (because it's usually Ryan, the only one who can raise), before I finally manage to win. Fengla immediately steps in, shakes Katya's hand, then leaves. The second floor of the tower is a barracks and a safe enough place to rest, so we do just that since we are about out of spells. At least Lillian got a lot of Arrows of Piercing out of the deal. It is now Day 88, Hour 4. We come across an area guarded by not one, not two but three of those Tarnished Sentries. I have to use up all of my spells (healing, damaging, debuffing/buffing and summoning), and Jherek still gets killed, but we eventually win. Luckily Ryan can raise dead now. On the bright side, Katya levels up. Stepping inside, we find a gnome whose tongue has not been cut out. His name is Norl and he's a jeweler whose legs have been broken by a man named Marketh (so he can't run away). He is more than happy to give us info. He tells us about Marketh, about a halfling lackey named Seth and a priest of Ilmater named Brother Poquelin. Apparently Poquelin thinks Ilmater is a god of causing suffering and pain instead of protecting others from it. Heading north, we meet Seth who Ladonna is able to bluff into letting us pass, by tricking him into thinking we're part of something called the Kraken Society. This allows us passage into the garden. 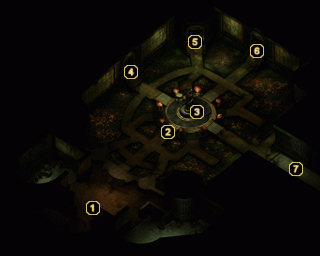 There are some shriekers there, giant mushrooms that make horrible sounds if you get too close. This summons a bunch of red mycanoids. Katya and Jherek take care of the latter, while the other four dispatch the shriekers before they can call more enemies. In the middle of the garden, two gnomes have torn down a statue of a dwarf and are building a new one. The older one says his name is Callard, and he is working with his son. He explains that Marketh demanded he build the statue of him, by threatening Callard's son. Callard has a picture of Marketh that he was using as reference for building the statue, and hands it over to us now that he's mostly done. Not sure if that will come in handy later, but probably. We move on to the old Dorn palace.  At first, it looks like this is a safe spot with no enemies roaming around. But the enemies are all stealthed thieves that like to run up and backstab you. Or rather, Ladonna. They like to backstab Ladonna. I don't know why. I send Katya ahead to aggro them, but most ignore her and sneak past her, past Jherek and Theron, and then start attacking Ladonna--and only Ladonna. I guess Ladonna is the new Jherek. Anyway, in one room we come across a kitchen and find a sack of potatoes, which Jherek quickly grabs, possibly for some kind of stew. Next, we enter a room where a guy named Flozem stands. He was the guy who drew that portrait of Marketh we picked up from the gnomes. Lillian tells him he's an amazing artist and should make it his full time job--and she would know, being a 'woman of the art world.' This actually persuades the guy to give up his life of evil, drop all of his gear, and leave. We get 60k XP and a Girdle of Stromnos, which raises the STR of any warrior who wears it to 19. I give it to Jherek, and he now gets a +7 to damage rolls.  We then find Flozem's brother, Fleezum, in another room. He attacks as soon as we finish talking to him, without provocation, because he thinks we might be trouble. He hurts Katya pretty badly, but the party is able to wipe him out before she falls. He has some nice -1 AC armor, which goes to Katya. In the last room, we encounter a nice bedroom...and a drow woman sporting a nasty shiner. She introduces herself as Ginafae. Katya immediately asks if someone hit her, but the drow claims she fell down some stairs. Katya doesn't buy this story and eventually Ginafae admits it was Marketh, her lover, but she totally deserved it...for accidentally speaking to him in her native language. She asks us to swear not to hurt Marketh, claiming that he's actually a good guy, he's just being influenced by Brother Poquelin. We agree to her promise, but there's a very good chance Marketh isn't going to give us a choice. The whole thing is pretty messed up. We move on to the second floor of the palace. 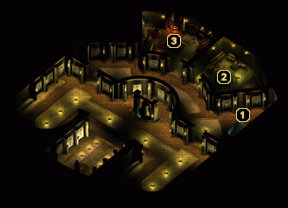 It doesn't take long to run into Marketh. Ladonna calls him out on his beating up of Ginafae, which Marketh not only admits to, but he jokes about it, as well. He seems to feel justified as Ginafae used to a cleric of Lolth...so that makes it okay? The party makes it known their intention is to take his badge, but surprisingly he gives it up willingly. Ladonna also demands he leaves his equipment, as well, and he reluctantly does so before scurrying off. We get quite a few magical items, among them being Valiant. This is a great new sword for Katya that increases her attack rate.  We also get a Robe of Enfusing, which is great for Ladonna.  We also get 150k XP for keeping our promise to Ginafae, and as a result Lillian levels up. Not sure it was worth it, letting a scumbag go like that, though. Current Party Levels: Ladonna (Enchanter 11) Ryan (Mage 9/Cleric 10) Theron (Illusionist 10/Thief 11) Katya (Paladin 10) Jherek (Fighter 9/Thief 11) Lillian (Bard 13) Next time: The Gnome Pit! |
|
|
|
Post by Daos on May 5, 2018 19:07:14 GMT -8
We return to the entrance level, then use the lift to take us into the gnome pit.  As soon as we arrive, a Svirfneblin named Tarnelm asks us to leave them alone, thinking we're among Marketh's flunkies. Lillian convinces him they mean no harm, and Katya hands over that sack of potatoes found in the palace kitchen (earning us 80k XP). Pleased that we helped and convinced we're allies, Tarnelm tells us there is a gnome village hidden nearby. Umber hulks are searching for it, and he wants our help in defending the village should they find it. On the way there, we run into some massive rhinoceros beetles and a couple of umber hulks. The hulks are the real annoyance, because they can cast confusion on you. I find summoning a bunch of minions to tank while the party uses long ranged weapons and spells helps. What also helps is Lillian's bard song. At level 11, she got a song called War Chant of Sith. When played, party gains -2 bonus to AC, +10% resistance to slashing, piercing, crushing, and missile attacks, and they regenerate 2 hit points every round. That last one is especially important. It means after every battle, if I'm willing to sit around and wait a bit, everyone is healed up to full capacity. No need to waste healing spells or potions. Kind of broken, really. Moving a little further, we come to a dead end. Or so it seems, as a bunch of umber hulks burst out of the walls and attack. It takes a lot of summons, as there are so many of them, to keep them busy. But eventually we manage to slaughter them all. Entering the umber hulk tunnels, we eventually find our way to the gnome village. One of them, a cleric named Beorn, warns us not to harm anyone here. We tell him about the potatoes we gave Tarnelm and promise we mean no harm, so he gives us free reign of the village. We meet a Drow merchant named Nym. We buy some spell scrolls from him--level 6, 7 and even 8. We can't use them yet, but it will be good to have them for later. We also buy a cage of squirrels and a cage of birds, which we can turn in to the Severed Hand garden later, along with the cask of pure water we found before. I think all we need now are the seeds. There's a little safehouse here where we can rest and get our spells back. It is now Day 89, Hour 23. We also encounter a Duergar merchant named Dirty Llew. He is completely dumbstruck by Ladonna, stumbling over his words. When she asks him why they call him Dirty Llew, he backpeddles, claiming he's known as Dainty Llew. When she asks if he can do anything with a rhinoceros beetle hide, he agrees to turn it into a shield for nine--sev--no, five thousand GP. It will take three days, though, so we'll have to come by later to pick it up. We encounter Beorn again, and he asks us for a favor. He explains that one of their priests was captured and enslaved in the Salamander Pits, and asks us to rescue him. We technically got what we came for--Marketh's Badge--but we might as well help out these poor gnomes. Besides, Katya would insist on it. We backtrack to the garden, and there are several exits to choose from, so let's start at the west. This brings us to the Artisan's District. ![]()  As soon as we arrive, we encounter some blind minotaurs and umber hulks. I assume the minotaurs have been blinded so they aren't affected by the umber hulks' gaze attack. We make short work of them. At one point, some umber hulks burst out of the walls to attack the party. After dispatching them, Katya notices a human corpse inside one of the tunnels. He is holding a mundane looking sword, but upon picking it up she realizes it's nothing but. At long lost, our paladin has a holy sword, Pale Justice. 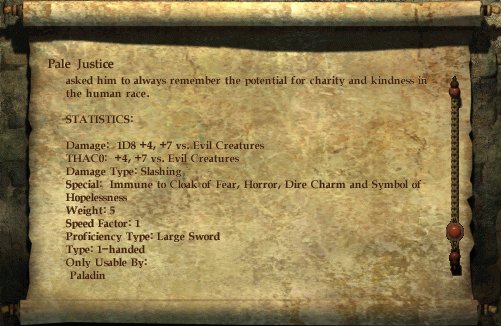 We fight some more blind minotaurs, as well, and find a cache of magical scrolls they were guarding. These include Power Word: Silence, Power Word: Stun, Monster Summoning V, and Mordenkainen's Sword. Ladonna holds on to them all for now, until we are ready to learn to use them. Now on to Malavon's Dome. Time to put an end to his evil. 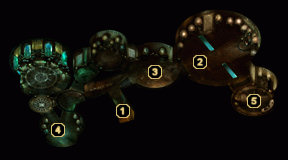 Right away, we run into a pair of umber hulk bodyguards. Katya and Jherek make short work on them, but both get confused and turn on each other. However, neither can hit the other before the confusion wears off. In fact, Katya rolled a 15 and still missed, while Jherek got a 17 at one point and still missed. We then encounter Malavon. The drow has a pair of umber hulks and iron golems with him, as well as a dozen gnome slaves. He threatens the latter if we don't surrender. He also claims to be Ginafae's brother. A battle breaks out, and we defeat him and his minions, although he drops lots of AoE spells that kill most of the gnomes. But then it turned out to be his clone, and the real Malavon shows up. We chase him around (he keeps Dimension Dooring, after dropping more AoEs). This actually is really annoying. He keeps wiping the party, and I have to reload. After several tries, we finally kill him, but--BUT--there's one small problem. Just before he died for real, he petrified Jherek and then shattered him. Now, there were some level ups. Theron, Ryan and Ladonna all leveled, and Ladonna was the important one here, because now she can use 6th level spells. So I teach her Stone to Flesh and try to use it on Jherek. It won't work. I try using Raise Dead, and it also doesn't work. So...I'm not sure how to fix this. The only thing I can think of is to find a temple and have them true resurrect him or something. For now, though, the party is pretty encumbered carrying all of Jherek's gear. I can't grab most of the loot because of this. (You may wonder why I didn't just reload. Well, when I finally won, Jherek's death seemed an acceptable loss, as I could just raise him now. But I needed to teach Ladonna Stone to Flesh first, so I saved in case she failed her learning roll (as that was the only copy of the scroll I had). I figured this was fine, because I still had the auto-save for when I first entered Malavon's Dome. But, once Ladonna knew the spell, she needed to rest to memorize it. And the game wouldn't let me rest in Malavon's Dome. So I stepped outside to rest, and this apparently triggered the auto-save, overwriting it. So I'm stuck with this scenario now, one way or the other.) I go ahead and make a trip to Kuldahar, but the cleric there can't seem to help. Resurrection has no affect, other than draining our coffers of gold. I reload, so as to not waste the time and money, and give up for awhile. I do some extensive searching online, but it's annoying because my searches keep coming up for stuff for Baldur's Gate, even though I am specifically searching Google for Icewind Dale. I do find someone who had the same problem as me, and a solution. As odd as it sounds, I had to try casting Stone to Flesh just outside of Malavon's Dome. Not in it, not anywhere else, just outside it. I try it and it works; Jherek is revived at 1 HP. I guess I didn't even need Raise Dead. Now we can grab the loot inside, including Malavon's badge. It's mostly spell scrolls and potions, including an Oil of Null Effect. We also find some seeds, which will be useful for the folk at the Severed Hand. Speaking of which...we have everything we need for there, so might as well start planning a return trip! Current Party Levels: Ladonna (Enchanter 12) Ryan (Mage 9/Cleric 11) Theron (Illusionist 11/Thief 11) Katya (Paladin 10) Jherek (Fighter 9/Thief 11) Lillian (Bard 13) Next time: There and Back Again! |
|
|
|
Post by Daos on May 10, 2018 18:23:29 GMT -8
We return to the gnome village and ask Dirty Llew for our shield. It's nice...but could be better. So we take it to the drow, Nym. He offers to enchant it for us for 30,000 GP. Ladonna talks him down to 28,000 GP instead. But it won't be ready for a tenday. It's currently Day 93, Hour 3, so it won't be ready until Day 103. What are we supposed to do until then? Well...I have some ideas. First, we returned to Ginafae to tell her that Marketh lived but Malavon died. She explains she cannot leave, because her brother placed contingency spells on her that will kill her if she tries. Katya gives her the oil of null effect we found, which frees her. We earn 80k XP for this. Next, we head back to the Severed Hand. This takes about 3 days. Once there, we climb back up to the top of Corellon Tower and hand over the seeds, water, squirrels and birds. This brings life back to the garden, making it beautiful again.  This brings us 438k XP, which levels up Theron and Lillian. We then climb back up to see Larrel, giving him the journal of his daughter, Evayne. He realizes he was wrong to judge the dwarves and we earn another 56k XP. We ask he teleport us back to Kuldahar, where we resupply, then make the 4 day journey back to Dorn's Deep. After resting again at the gnome village, we then head for the Salamander Pits.  It's not long before we find Guello, the Svirfneblin Ruby priest we were asked to rescue, among the slaves. He tells us the only hope of escape is if we kill the salamander leader, Shikata. We find Shikata and a bunch of other salamanders together, and easily cut through them without much issue. Guello asks us to meet him back at the gnome village, so we head back. Once there, we find him with Beron, reunited. Both clerics now offer their services, should we need healing or raising. And we earn 80k XP, which levels up Ryan and Katya. Next we head to the Greater Forge. 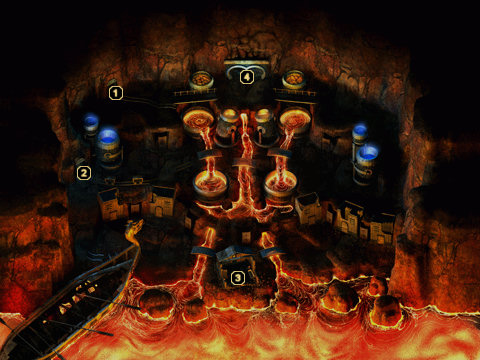 This place is big and there's lava everywhere. Immediately we're attacked by salamanders and elementals. They aren't too difficult. But later on, we run into some fire giants and have some real problems. The fire giants are protecting an elf fighter named Maiden Ilmadia, and she has one of the badges we need to proceed. The problem is, whenever I pick a fight (either with the giants or Ilmadia), I get swarmed and killed and have to reload. It takes about 4 tries before I find the right strategy, which is: Summon a lot of monsters, Bless/Haste them and the party, send the monsters to the front line while everyone (even Jherek and Katya) use ranged attacks, and blast AoE spells on the clustered up enemies while they are busy fighting the summoned monsters. Eventually we win, get the badge, and Jherek levels up. We then return to the gnome village to rest up, regain our spells, and pick up that enchanted shield. It's better than Jherek's shield, so it goes to him. It is now Day 103, Hour 4.  Up next, we head to the Black Temple. We have 5 of the 6 badges we need.  We're swarmed almost immediately by Boneguard Skeletons. Fortunately, they aren't too difficult to deal with, especially with Lillian's healing song. Deeper in, we find several clerics of Ilmater, all protected by some kind of forcefield and speaking of death and blood and torture. There are also a ton of undead about, including several greater mummies and zombie lords. Once all the undead are defeated, we find a golden idol that starts flinging spells at us. Katya, Jherek and Ryan manage to smash it, but not before it kills Ryan. Luckily, this breaks the spell on the clerics, and they snap out of it, and agree to heal us and resurrect Ryan. The cleric in charge, Perdiem, explains that he and the others lived in a monastery outside of Illefarn, until Brother Poquelin showed up. Poquelin is not a cleric, but some kind of sorcerer, and he enspelled the entire monastery, forcing them to come with him. Those that were able to resist were killed and turned into undead to guard this temple. He hands us his badge without question (along with 150k XP). Now we have all six, and can go and face this Poquelin for a final showdown. Current Party Levels: Ladonna (Enchanter 12) Ryan (Mage 10/Cleric 11) Theron (Illusionist 11/Thief 12) Katya (Paladin 11) Jherek (Fighter 9/Thief 11) Lillian (Bard 14) Next time: The conclusion! |
|
|
|
Post by Daos on May 13, 2018 19:49:17 GMT -8
Last we left off, the party had been inadvertantly caught up in Poquelin's teleportating spell and whisked back to Easthaven, or what was left of it.  First order of business is to look for survivors. Most buildings are trashed, but we discover the tavern where this all began, the Winter's Cradle, still stands. A few cyclopes are guarding it and one stands at the door, demanding the 'hooman' come out. We easily dispatch the cyclopes, just before the Haste spell still on Jherek and Katya wears off. Good timing! Stepping inside, the place is trashed; tables and chairs have been smashed into kindling. We head down into the cellar and find Old Jeb, who has unfortunately turned to drinking again. He doesn't tell us much before he passes out, just that giants have invaded the town and that the town priest, Everard, was taken prisoner with the rest of the villagers. Well, at least they are still alive then? We rest up in the cellar and when we wake up, Jeb is still out cold. Best just leave him there, where he's safe. It is now Day 104, Hour 1. Working our way south, we find a corral filled with villagers guarded by more cyclopes. After easily dispatching them, we speak with Everard. He explains that he was taken into the Creshinibon and tortured, as the cyclopes were trying to force him to break the glyphs on Jerrod's Stone. You all remember way back at the beginning of this playthrough I mentioned the importance of Jerrod's Stone and the story behind it, right? Well, in case you forgot, the long and short of it is this. If Jerrod's Stone is broken, it will open up a portal into the Abyss, unleashing an infinite army of demons onto Faerun. Fortunately, Everard knows how to get into the crystal tower, and teaches us how. It's time to prepare for the final showdown--the stakes being the entire world. But first, we manage to run into Jhonen. Remember him, the guy who we gave that broken sword to that belonged to his ancestor that we got from a lake spirit? Well, he tells us that the sword mended itself one night while he was sleeping and hands it over to us to help. It's pretty good.  Technically, Katya's holy sword is better when used against evil creatures, but if facing something neutral, I might switch to this one. We also get 280k XP, and as a result, Ladonna, Jherek and Lillian all level up. Entering the tower, we find the first floor is basically what is left of the old temple of Tempus. 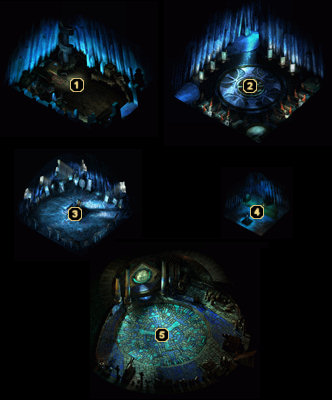 Everard joins us and explains he'll work to open the way to Jerrod's Stone for us, but we should climb the tower and see if we can find another way in the meantime. Moving up to the second floor, we find what looks like some kind of rest area--lots of pillows and such. So we grab some rest to fill up those blank spell slots we got during level ups. We then buff back up. We're ready for the final showdown. We move into the next room and are greeted by none other than Pomab, the jerk store owner we met when we first arrived in Easthaven so long ago. He claims to work for Poquelin and in fact, it was his idea to send an expedition to Kuldahar in the first place, knowing that Hrothgar and any other heroic figures in town would go, die in the avalanche and leave Easthaven defenseless. Pomab creates multiple fake copies of himself and sics four crystal sentries on us. Ladonna uses Haste on the party. Then Jherek and Katya chase down the Pomabs, killing them one by one, while the others basically 'kite' the sentries. Because they are hasted, the sentries can't keep up. Every now and again, the casters stop to sling/shoot at a fake Pomab, before moving on. Once all of the Pomabs are dead, the sentries crumble to dust. Ryan finds a Wand of Lightning on the body of the real Pomab. Nice. We return to the resting area, heal up again, and then prepare to move on. We finally reach Jerrod's Stone, where Poquelin is waiting. He opens the gate to the Abyss, but Everard shows up and, like Jerrod before him, sacrifices himself to seal it again. Poquelin then turns into a giant demon and summons two Iron Golems. And this is where everything goes to hell, because I run into a hell of a bug. My first try didn't go well. The golems aggro'd Ladonna immediately, killed her, then moved on to kill everyone else. Katya and Jherek kept attacking Poquelin (or Belhifet as he is now called), but then they died, too. Okay, reload. Second time went a little better. First, I realized that the golems automatically target Ladonna, so tried having her kite them around the room while Jherek and Katya fought Belhifet. None of the casters can touch him. Their weapons are too weak (they must be +4 to hit him) and he has 80% MR, so spells are also useless. But I also realized another problem, which was I can't touch the golems. Like, I don't mean their AC and MR is so high that attacks and spells fail, I mean the game doesn't even seem to register they are being attacked at all. There are no dice rolls or anything. So my third try, I think I have things figured out. I have Ladonna haste the party, then book it. She kites the golems while Katya and Jherek fight Belhifet. There are permanent Dispel Magic traps all over the place, though (they cannot be disarmed), and it's pretty easy to trigger them. I memorize their placement, but eventually Ladonna dies. I have Ryan raise her, and they kill her again. Then they target Ryan. Then when he's dead, they target Theron. Then Lillian. By this point, Belhifet has been at "Almost Dead" for about twenty minutes and I'm really getting annoyed. I also realize that Belhifet isn't fighting back. He just stands there and every few rounds, casts a spell that works like Dimension Door, except it blasts everyone in melee range with fire first. But he doesn't attack otherwise. Also, the golems, having killed the last mage, just...stop. They don't target Katya and Jherek, they just cease movement. I swear I spend another 15 minutes fighting Belhifet, to no avail. He won't die. But Katya does. And then at long last, so does Jherek.  So what now? I am getting reaaaally tired of watching this cutscene play again and again. For my fourth try, I go ahead and turn down the game's difficulty to the easiest setting. This time, I'm successful. Belhifet doesn't seem to bug out this time, nobody dies as Ladonna kites the two golems around the room. Eventually we win, and the final cutscene plays. Man, David Ogden Stiers could really ham it up. RIP. And that's it. I started this playthrough in January, and at long last, it is now over. I hope you all enjoyed reading about it. That was kind of exhausting. I don't think I'll be doing another one of these for awhile.  Final Party Levels Final Party Levels: Ladonna (Enchanter 13) Ryan (Mage 10/Cleric 11) Theron (Illusionist 11/Thief 12) Katya (Paladin 11) Jherek (Fighter 10/Thief 11) Lillian (Bard 15) |
|


